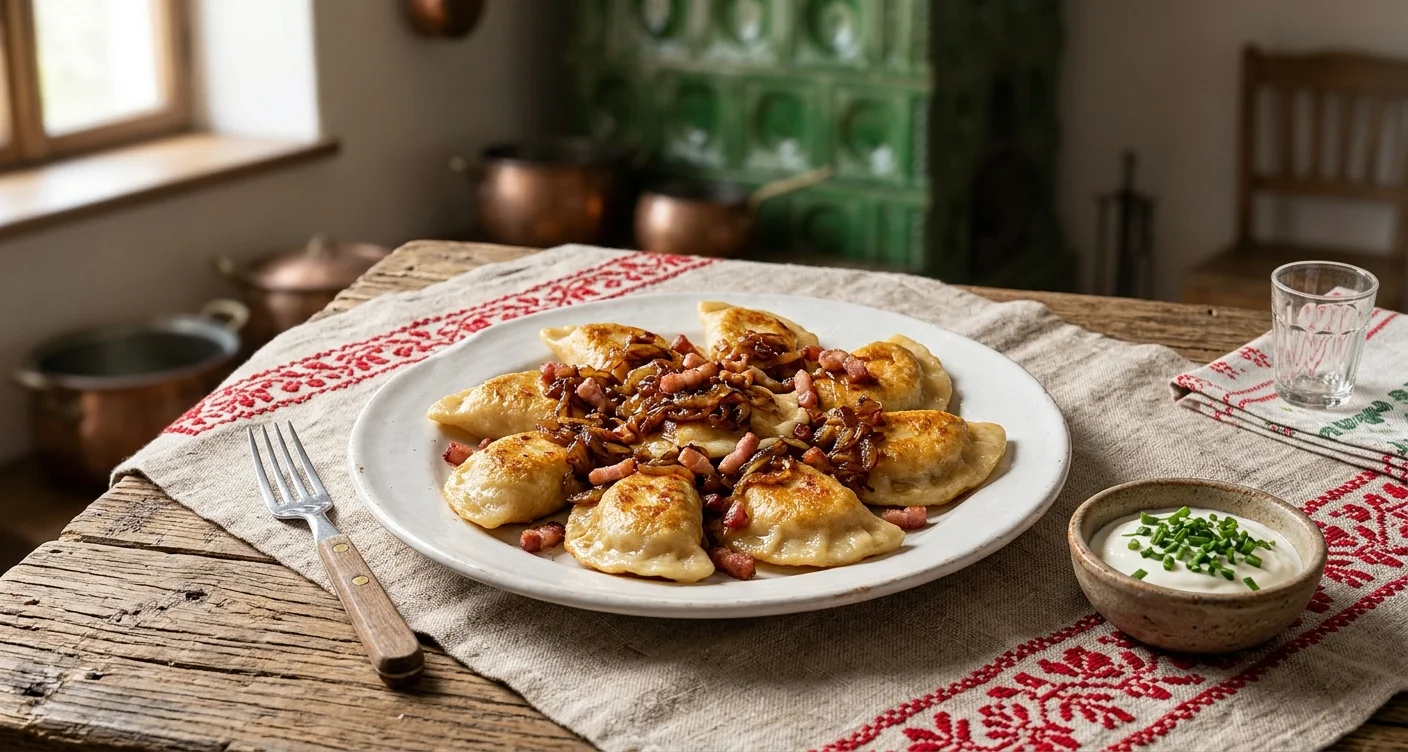
Pierogi ruskie (Polish pierogi)
Ingredients
Method
- Cook the peeled potatoes in salted water for 20 minutes, drain and mash them while still hot.
- Slice 2 onions and fry them in half the butter for 10 minutes until golden. Mix them into the mash with the crumbled twaróg, salt and plenty of pepper. Leave to cool.
- For the dough, mix the flour with a pinch of salt, add the lukewarm water and melted butter, then knead for 8 minutes until smooth. Leave to rest for 30 minutes under a tea towel.
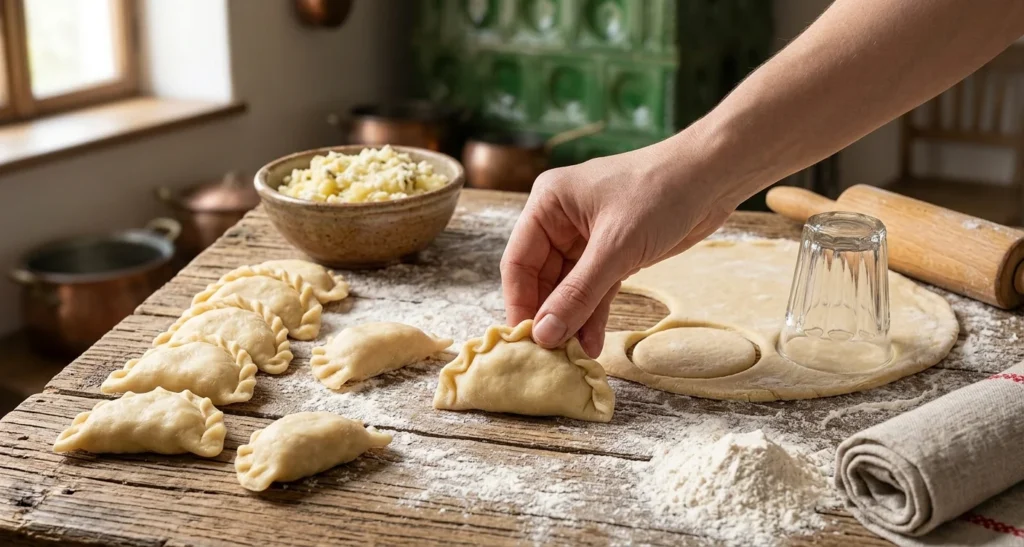
- Roll the dough out to 2 mm thick and cut out 7 to 8 cm rounds with a glass. Put a teaspoon of filling in the centre, fold into a half-moon and pinch the edges firmly.
- Cook the pierogi in small batches in a large pan of simmering salted water. When they rise to the surface, count 2 minutes, then lift them out with a slotted spoon.
- Fry the last onion, sliced, with the bacon in the rest of the butter. Serve the pierogi topped with this mixture, with sour cream and chives.
Notes
A thin, tender dough, a melting filling of potato, farmer’s cheese and golden onions, and a pan of crispy bacon to finish: pierogi are Poland’s national dish. Here is our traditional Polish pierogi recipe, in its most famous version, pierogi ruskie.
The history of Polish pierogi
Pierogi are half-moon dumplings that have been made in Poland since the Middle Ages. Similar dumplings exist under close names across Central and Eastern Europe, from Ukraine to Slovakia. In Poland they are everywhere: in family kitchens, in the famous milk bars, the bar mleczny, and on the Christmas Eve table. Every family has its own filling and its own way of sealing them.
Pierogi ruskie, the classic version
Pierogi ruskie are the most popular of all. The name does not mean “Russian”: it comes from Ruthenia, a historic region in the east of old Poland, now in Ukraine. The filling combines potato, twaróg, the Polish farmer’s cheese, and lots of golden onions. They are served with crispy bacon, onions and a spoonful of sour cream.
The potato and twaróg filling
Twaróg is a fresh curd cheese, quite dry and slightly tangy. Outside Poland, well-drained farmer’s cheese, quark or ricotta all work well. The filling should be well peppered and fairly firm: floury potatoes and a well-drained cheese stop it from being too wet.
An easy pierogi recipe
Our easy pierogi recipe comes in three stages: the filling, the dough and the shaping. Sealing the pierogi takes the longest, but it is also the most sociable part. In Poland, people often make them together around the table. Allow about forty pierogi for 6 people.
Egg-free pierogi dough
Our egg-free pierogi dough is the softest version. Lukewarm water and melted butter make it elastic: it rolls out thinly without tearing and stays tender after cooking. Some families add an egg, which gives a firmer dough. The 30-minute rest matters: the dough relaxes and becomes easier to roll.
How to cook pierogi
To cook pierogi well, use a large pan of salted water at a gentle simmer: a hard boil can burst them. Cook them in small batches, stirring once so they don’t stick to the bottom. As soon as they float, count 2 minutes. You can then fry them for a few minutes in butter for a crisp surface.
Sauerkraut and mushroom pierogi
Sauerkraut and mushroom pierogi, pierogi z kapustą i grzybami, are a Christmas Eve classic, served at the Wigilia supper. That evening the meal is traditionally meat-free. The filling is made with rinsed, cooked sauerkraut, soaked dried mushrooms and a golden onion, all finely chopped.
Meat pierogi
Pierogi z mięsem are filled with cooked minced meat, often leftover roast pork or beef, with a golden onion and a little stock to keep the filling moist. It is a very good way to use up the leftovers of a stew.
Sweet fruit pierogi
In summer, Poles make sweet fruit pierogi: strawberries, blueberries, pitted cherries or plum quarters. With the same dough, the fruit is sealed in with a pinch of sugar. After cooking, they are served with sweetened cream, or with sugar and a little melted butter.
Pierogi in a Thermomix
In a Thermomix, the dough kneads in 2 minutes: add the flour, salt, lukewarm water and melted butter, then run the dough mode for 2 minutes. You can also fry the onions for the filling for 8 minutes at 120 °C, speed 1. Cooking the potatoes, shaping and cooking the pierogi are then done as in the recipe.
Freezing raw or cooked pierogi
To freeze raw pierogi, lay them on a floured tray without touching and freeze for 2 hours, then transfer them to a bag. Cook them straight from frozen, adding 2 minutes. Cooked pierogi freeze well too, once completely cool and lightly oiled. They keep for 3 months.
How to reheat pierogi
The best way to reheat pierogi is in a frying pan: brown them for 3 to 4 minutes per side in butter, with a few onions. They turn crisp outside and stay soft inside. In the fridge, cooked pierogi keep for 2 days.
Pierogi vs ravioli: what’s the difference?
Pierogi and Italian ravioli are both filled pasta, but they are different. Pierogi dough is often egg-free, thicker and softer. Pierogi are larger, always half-moon shaped, and their fillings are more rustic. They are served with butter, onions and sour cream rather than with a sauce.
Pierogi calories
A serving of about 7 pierogi ruskie with their topping contains around 630 kcal, for 6 people, with 20 g of protein. For a lighter dish, serve them without bacon, with onions and a little yogurt instead of sour cream.
What to serve with pierogi
Serve pierogi with a cucumber and dill salad or a potato salad such as German Kartoffelsalat. If you love potato dishes, also try Norwegian lefse, or Swedish köttbullar for another comforting northern European dish. For a mushroom twist, our porcini risotto has more ideas. A good amount of freshly ground pepper is essential in the filling, and our spice guide will help you vary the flavours. Another Polish potato classic: placki ziemniaczane, crispy grated potato pancakes.
Frequently asked questions
Why do my pierogi open while cooking?
Usually the edges are not sealed well, or a little filling got between them. Keep the edges clean, pinch them firmly and cook the pierogi in water that simmers rather than boils hard.
Can pierogi be made the day before?
Yes. Cook them, let them cool on an oiled plate and keep them in the fridge. The next day, simply fry them in butter.